How to use Google Sheets as a Post/Get/Webhook Endpoint
Shameful plug post, but I'll be using Particle devices to demonstrate how to setup a Post/Get/Webhook right on a Google Sheet. Although Excel has more spreadsheet features than Google Sheets, the nice thing is that since your google sheets resides on some server connected to the internet, you can essentially use Google Sheets as a basic server to receive and send requests to an IoT device somewhere else. Take a look at how simple this spreadsheet is:

All requests will operate under a request/response format, the idea being that the Google Sheet I made will shoot off a request, and a response will be collected. ONE IMPORTANT NOTE: Since you will be allowing anonymous access in order to use Google Apps Script, PLEASE only use this for development testing purposes ONLY, not to run a production server. If someone finds your Google Sheets URL endpoint, they can flood your sheet with requests. Furthermore, your device access token may be exposed.
With that said, let's get started.
First you will want to create a new Google sheet which looks like what I've shown above. You can ignore cells B3, C3, and D2-D3, as these will be populated automatically by the webapp you'll create using Google Apps Script. You don't have to do this, but I merged cell D2 and D3. To create the buttons, go to Insert >> Drawing to draw a basic rectangle with some text in the middle. You will be able to assign function to these buttons you created later.
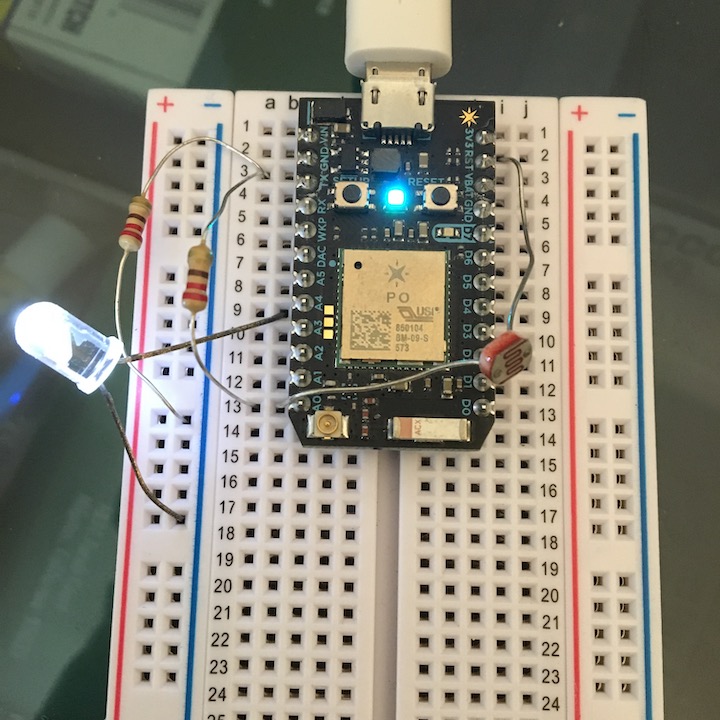
Particle (www.particle.io) makes it easy for you connect sensors to the internet. I'm using a Particle Photon in this example, but you can use whatever you want. Take a look at docs.particle.io to get your Photon up and running. From the starter kit, you can set up your resistors, LED, and photoresistor like I did in the below image:
You will need to flash a binary to the Photon that sets it up to receive function calls and publish variables and events. You can how I did that in this script: https://github.com/simjxu/partiscripts/blob/master/getpostwebhook-example/photoresistor.ino
In my setup() section I've called out 3 different Particle.variables: analogvalue, which is the output from the photoresistor, brightness, which is the brightness of the LED, and setpoint, which is the setpoint issued to the LED. I've also created a Particle.function called led, which toggles the blue LED situated on D7 on the board. Lastly, I've created a Particle.publish, which tracks the analog value and publishes a low_light event when the value drops below 50.
What I will do now is use my "Post Request" function on my google sheet to call the led function and toggle on/off the LED. I will use the "Get Request" button to pull the analogvalue variable. Lastly, I will create a webhook to publish the low_light event details to my Google sheet when the event publishes.
First, go to the Google Sheet and go to Tools >> Script Editor. This will allow you write javascript which controls how your Google Sheet behaves. Start off in the script by setting some Global variables. You have to retrieve you access token from build.particle.io, by clicking the settings tab. The device id is the device of your photon, and spreadsheet id is the long string of in your Google Sheets URL. You can also edit the Sheet name if you decide to change that.
// Set Global Variables
/*
ACCESS_TOKEN: Go to build.particle.io and click "Settings" on the left side panel
PARTICLE_DEVICE_ID: Identify device ID from the console, or from using "particle list"
SPREADSHEET_ID: Look on the URL for your Google Sheet for the long random string
*/
PropertiesService.getScriptProperties().setProperty('SHEET_NAME', 'Sheet1');
PropertiesService.getScriptProperties().setProperty('PARTICLE_ACCESS_TOKEN', '<enter access token>');
PropertiesService.getScriptProperties().setProperty('PARTICLE_DEVICE_ID', '<enter device id>');
PropertiesService.getScriptProperties().setProperty('SPREADSHEET_ID', '<enter spreadsheetid>');
Handling the Post Request:
Go back to your Google Sheet, and right click the button you labeled "MAKE POST REQUEST", and assign it a function called PostRequest or whatever you decide to name it. In the script file, add the function below. You will be using the Particle API URL, and sending the request there. The request will require your access token, and the argument (in the case above, either "on" or "off" for the LED).
// Handle the button click for Post Request -------------------------------------------------
function PostRequest() {
  var spreadsheet_id = SpreadsheetApp.getActiveSpreadsheet().getId();
  var sheet = SpreadsheetApp.openById(spreadsheet_id).getSheetByName(
    PropertiesService.getScriptProperties().getProperty('SHEET_NAME'));

  // API url goes like this:
  // https://api.particle.io/v1/devices/<deviceid>/
  // led?args=on&access_token=<accesstoken>
  var device_id = PropertiesService.getScriptProperties().getProperty('PARTICLE_DEVICE_ID');
  var access_token = PropertiesService.getScriptProperties().getProperty('PARTICLE_ACCESS_TOKEN');
  var function_name = sheet.getRange("B4").getValue();
  var request = sheet.getRange("B2").getValue();
  var url = "https://api.particle.io/v1/devices/" + device_id + "/" + function_name + "?" +
    "access_token=" + access_token;

  // Create a form which will be sent as the payload to the post request
  var formData = {
    'args' : request

  };

  // Create the options
  var options =
      {
        "method"  : "POST",
        "payload"  : formData,
        "followRedirects" : true,
        "muteHttpExceptions": false
      };

  // Send Post request body to the URL indicated
  var result = UrlFetchApp.fetch(url, options);

  // Display response in Cell
  if (result.getResponseCode() == 200) {
    var params = JSON.parse(result.getContentText());
    sheet.getRange("B3").setValue(params);
  }
}
The Get request is even simpler, as now you don't have to include a form as part of the package to be delivered. Don't forget to assign the function to the "MAKE GET REQUEST" button.
// Handle the button click for Get Request -------------------------------------------------
function GetRequest() {
  // Start by trying in postman

  // Set which spreadsheet to pull or output information
  var spreadsheet_id = SpreadsheetApp.getActiveSpreadsheet().getId();
  var sheet = SpreadsheetApp.openById(spreadsheet_id).getSheetByName(
    PropertiesService.getScriptProperties().getProperty('SHEET_NAME'));

  // API url goes like this:
  // https://api.particle.io/v1/devices/<PARTICLE_DEVICE_ID>/<VARIABLE_NAME>?access_token=<PARTICLE_ACCESS_TOKEN>
  var device_id = PropertiesService.getScriptProperties().getProperty('PARTICLE_DEVICE_ID');
  var access_token = PropertiesService.getScriptProperties().getProperty('PARTICLE_ACCESS_TOKEN');
  var variable_name = sheet.getRange("C2").getValue();
  var url = "https://api.particle.io/v1/devices/" + device_id + "/" + variable_name + "?access_token=" + access_token

  // Not sure if all options are necessary
  var options =
      {
        "method"  : "GET",
        "followRedirects" : true,
        "muteHttpExceptions": true
      };

  // Send Get request body to the URL indicated
  var result = UrlFetchApp.fetch(url, options);

  // Display response in Cell
  if (result.getResponseCode() == 200) {
    var params = JSON.parse(result.getContentText());
    sheet.getRange("C3").setValue(params);
  };
}
Finally, the Webhook. We need to set up the Google Sheet to be able to receive a message that is published to it. This is done through a function called doPost(). You will not be able to use any name you want, because doPost will be the handler to a post made externally.
// Handle the webhook using doPost() -------------------------------------------------
function doPost(e){
  // Set which spreadsheet to output this data to
  var spreadsheet_id = PropertiesService.getScriptProperties().getProperty('SPREADSHEET_ID');
  var sheet = SpreadsheetApp.openById(spreadsheet_id).getSheetByName(
    PropertiesService.getScriptProperties().getProperty('SHEET_NAME'));

  // Fill the "Webhook Data" cell with the parameters of the webhook package sent
  sheet.getRange("D2").setValue(e.parameter);

  return ContentService.createTextOutput(JSON.stringify({text:"webhook received"})).setMimeType(ContentService.MimeType.JSON);;
}
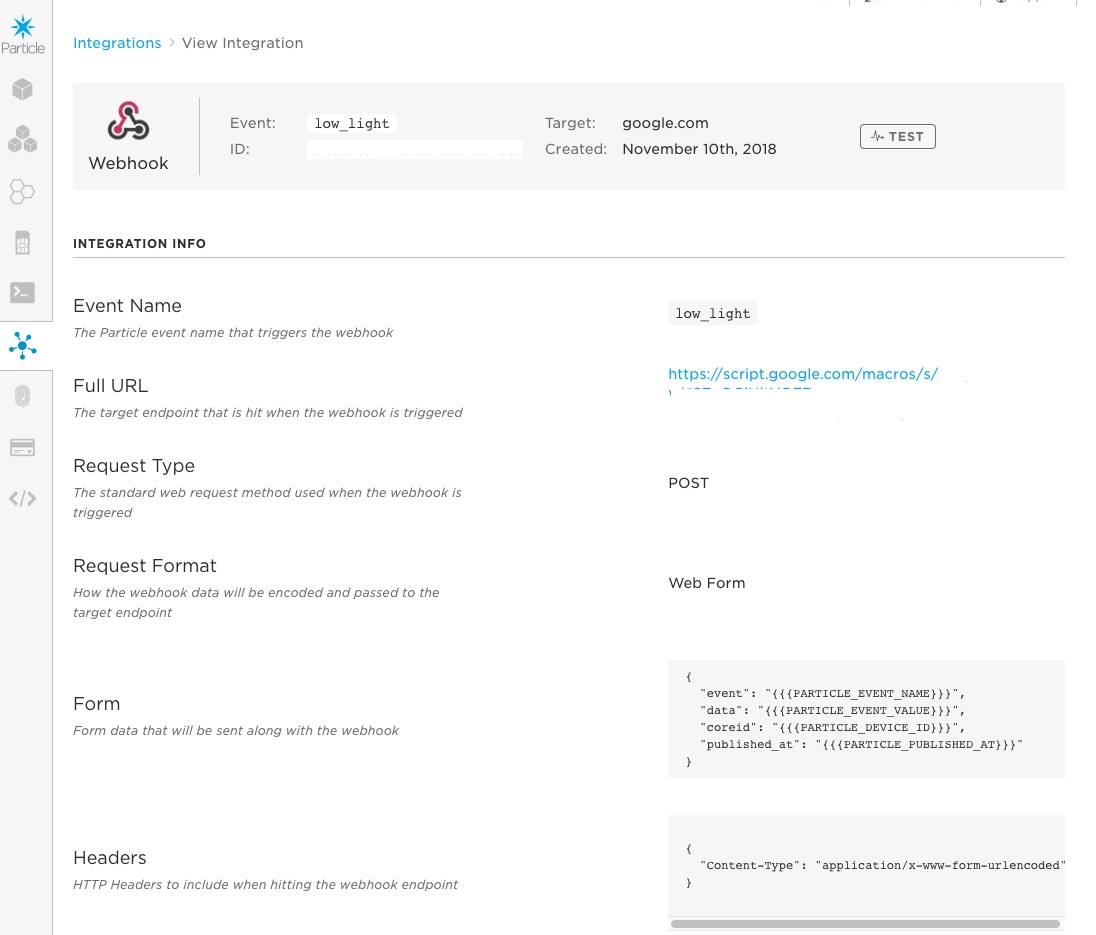
Once the full script is complete (full script available here, you will need to edit the Global variables section at the top: https://github.com/simjxu/partiscripts/blob/master/getpostwebhook-example/googlesheets_pgw.gs)go to your Google Apps script (https://script.google.com...), and select Publish >> Deploy as webapp. Copy the webapp URL, which you will need to setup the webhook on the Particle console. Then in the section that says "Who has access to the app", you will need to select "Anyone, even anonymous". This will ensure that the Particle console can make changes to the google sheet. The webhook must also be set up as an integration on console.particle.io. with a Web Form setup.

Under the Full URL section, you will need to include the target URL for your google sheets webapp. It should begin with https://script.google.com/... This is the URL you copied earlier after deploying as a webapp.
That's it! Now you have a Google sheet with a webapp that will communicate between the sheet and your Particle IoT device. Try changing the Post Request section (B2) to "on" or "off" and clicking the "MAKE POST REQUEST" button. Try changing cell C2 to brightness, or setpoint, and clicking "MAKE GET REQUEST" to view the values. Try holding your hand over the photoresistor on the photoresistor to block out enough light to trigger the webhook event.
